
How Does an Electric Soldering Iron Work?
In our daily life, we may not have the opportunity to touch the soldering iron, but for the technology experts who like DIY, they will often use it. If you are also interested in DIY, then soldering with a soldering iron is an essential skill.
Electric Iron Using method.
External heated electric soldering iron (high power, suitable for welding with large solder joint or hardware) For some simple digital products, an internal heated electric iron (small power, fast heating, suitable for ordinary solder joint welding) is enough. If you want more playability, an adjustable constant temperature electric soldering iron is your best choice (adjustable and stable temperature, single handle temperature regulating type and welding platform).
The choice of iron tips is very important.
The selection of soldering iron tips is based on the contact surface of the object to be welded.
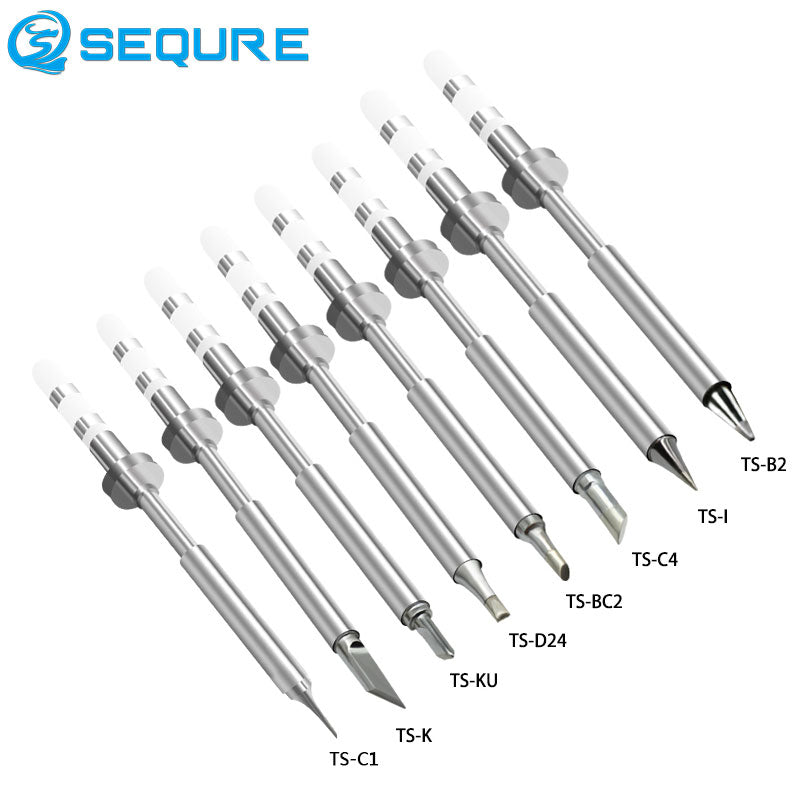
For example, for common plug-in components, we usually choose horseshoe head (large contact surface); small chip components can be pointed or curved (dense components welding); for conventional chips, we can use knife head (convenient for drag welding). Of course, the more advanced DIY play is according to their own needs to polish their own unique shape of the iron tips.
As for the newly bought soldering iron, we can't use it immediately. We have to tin the new iron for the first time.
Plug in the power supply and apply rosin to the soldering iron head when the temperature gradually rises. When the rosin smokes and the soldering head can melt the solder, tin wire is used to coat the solder head, so that the solder tip can be coated with a layer of solder to achieve a bright surface.
After the first tin application, we also need to use some auxiliary solder, such as solder (tin wire), flux (auxiliary welding, such as rosin), sponge (to clean the iron head, add water), tin absorber or solder strip (remove the excess tin).
Next, we are going to pretreat the welded pair.
The first step is to solder the component. If it is a new component, this step can be omitted (if the pin is oxidized or pre tinned). If the old component is disassembled and soldered, the old tin on the old component should be removed and the pin should be smoothed so that it is easy to solder the hole in the circuit board.
Then the welding parts of the circuit board are processed.
In fact, it's very simple to ensure that the welding parts are clean and free of oxidation. You can wipe the welding surface of the circuit board with an eraser, so that the pad can reach the welding state. First insert the element into the welding hole, dip the soldering iron head with rosin (rosin is the flux, which can remove the oxide layer on the welding surface, increase the fluidity of tin, and effectively avoid dry welding, thus improving the welding quality). Then, put the electric soldering iron close to the component pin and pad, and then send the tin wire to the contact point. At this time, tin will automatically fill the whole pad.
At this time, first remove the tin, and then lift the electric iron, waiting for the solder joint to solidify.
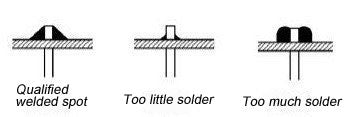
The standard requirement of solder joint is to be round and full, beautiful, no burr and no false soldering.
In the welding process, many partners cannot control the amount of tin, resulting in excessive tin, solder joint is too large. At this time, we need to remove the excess tin. We can use a tin suction device (use suction to absorb the melted tin), or we can use a tin absorbing strip (using copper wire to absorb tin). If we don't have these two tools, we can also add rosin to increase the fluidity of solder. We can use a soldering iron to remove the tin from the solder joint (add rosin to melt the solder joint, and then add rosin to the solder joint Wipe the tin on the soldering head with sponge, add rosin to melt tin, and repeat the above operation to remove the excess tin on the solder joint).
The same method is used to weld SMD components. In our example, we take patch welding as an example.
It needs to be explained here that the electric soldering iron should not stay on the pad for too long. It will be good for two or three seconds. If the time is too long, it is likely to damage the components or the pad. If the soldering is not done once, remove it and weld it again.
For adjustable temperature soldering iron or soldering station, the temperature can be controlled independently. Lead free soldering is generally about 350 ℃ and lead soldering is about 300 ℃. This temperature is only a reference temperature. According to the lead content of tin wire used, temperature error of soldering iron, heating surface of soldering head, soldering pad process of circuit board, component type and welding method, there will be up and down About 50 ℃ difference, this requires us to run in with their own soldering iron in peacetime, and sum up experience.